
 Ski Windham, live webcam News & Articles Gear Guide Ski Tuning Ski School Skier's Lexicon Explanation of Snow Conditions Ski Car! The Links Every Skier Needs The Big Ten |
Ski Tune-Up Online Guide to Sharpening, Waxing, Maintenance and More
The most important thing to know about waxing, sharpening, and maintaining skis is that even a little bit helps. If you read ten different guides to waxing, you'll find ten different sets of directions. The best waxing, of course, is that rare guy at the ski shop who manages to do it so it lasts and lasts. But everybody's broke at some level, so why not save some cash... Sharpening or EdgingWe'll start with the easy one. Use a big fat rubber band to hold your ski brakes up, or get a couple of the pre-formed rubber ski brake retainers designed for the job. Scrape off any excess wax, otherwise it will gum up your file (Obtain a regular mill bastard file.) Hold the file flat against the bottom of your skis with two hands, and draw it along the base. Start from the top and go to the bottom. Nothing really wrong if you go the opposite way, or even if you do it both ways. Whatever works. If you can position your skis so that both ends are supported by something, you will do a better job. The easiest thing is three or four short pieces of 2 x 4 stacked, nailed together, and the top covered with a rag. Position the shovel of the ski on one block, and the bottom of the ski on the other. This allows the ski to flex as you go, but still enables you to really cut with the file. It works better than standing your skis against a wall. Actually, uh, before you do the bases, you should start with the sides. Sorry, momentary lapse. To do the sides of the ski, hold the file flat against the edge (as flat as you can) and work your way up one side and down the other. The people who sell the specially-angled file devices will holler that this puts the wrong angle on your edges, but as long as you are close, you'll be fine. The reason to do the sides first, then the bottom, is because you can be certain that the bottom is flat, it sort of "trues up" the sharpening. Technically, of course, you want a 1º bevel on the bases, so that the base of the ski does not meet the snow straight on...creates sort of a transition, eases turning. How do you get the bevel with an imprecise file? Just hold the file on each side, press hard on each side, and the slight flexing in the center of the file (over the center of your ski bases) will naturally create a very slight bevel. Homegrown Stoneground
At right, typical stone ground base makes even a ten year old ski look good as new. Face it, nothing beats a stoneground finish from a ski shop. You can come close to this by doing your own base structure with sandpaper...click here for the why & how of structuring your skis. Wax, Oil, and other Funky StuffEver been skiing along on a mild day, hit a patch of snow and felt like somebody put the brakes on? That's the oils in the manmade snow gumming up your skis. Yecch. Even in cold weather the traces of goo from manmade snow accumulates on your sticks. You want to get that -- and any wax -- off your skis prior to any maintenance. Use a scraper to scrape off as much old wax as possible, then clean the bases with lighter fluid, or a stronger solvent, such as paint thinner, and a cloth. P-Tex
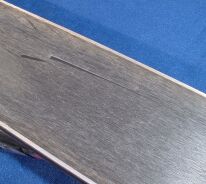
The grooves or gouges shown in this picture are typical of most skis; even in the finest powder minor cuts and grooves are expected wear and tear due to lift equipment, unseen debris, etc. In most cases these light grooves will not adversely affect the performance of the ski...999 skiers out of 1000 would not notice any benefit from a p-tex job in this case. Overdone. It's as simple as that. Most p-texing is really not required. Minor -- even medium -- grooves in your skis will not hamper performance, unless your name is Alberto Tomba or Picabo Street. Deep gouges and whatnot should be repaired. Buy the plain old p-tex "candle," light the sucker on fire, soften it up, blow out the fire, roll off the burned part on a hunk of wood, and mush the clean molten p-tex into the hole. The easier way is to just drip it in while it's flaming, but this also drips carbon onto your skis. Either way works, of course, but the carbon residue is undesirable. Next, use a metal scraper to scrape the excess p-tex off, and leave the filled part even with the surrounding base of the skis. P-tex can also be used to fill in gouges in the top sheet -- if you feel you must. It isn't the ideal material for this, but it'll do just fine. WaxingThe simplest form of waxing is to rub the cold wax onto your skis. This works, but certainly will not last as long as a hot waxing. If you can't be bothered with the iron and all the grief, just rub the stuff on. For the rest of us, read on... First, get out the iron, and your base wax or all purpose ski wax. Turn the iron on...and adjust the temperature so the iron stays at 248° if you have a digital one. If not, test the wax against the iron...continually turn it up until the wax smokes, then turn it down until the wax no longer smokes. Hopefully that's about 248º. This is close to the melting temp. of most bases. It opens up the pores of the base and actually draws the wax into the base! Now were ready to wax. Holding the iron vertically take a stick of wax and touch it directly to the tip of the iron so the wax melts and runs off the iron and onto the ski without having to drip all the way down the iron. Once the wax drips on the ski, move the iron in a circular motion and then down the length of the ski, so that you have a number of little drops of wax on the bases. Next, Start at one end of the ski and iron in the wax to spread it evenly all over the ski. Once this is done go back and start at one end of the ski, turning the iron sideways, set the iron down on the ski and move it slowly and steadily down the entire length of the ski. Very slowly...as you move you should see about 1 ½ of melted wax behind your iron. After the second pass, you should be able to feel warmth underneath the shovel or tip of your ski. Do this three times. This process opens the pores of the base and pulls the wax into it. Once you've completed three passes, set the ski aside, and let it cool for about 35 minutes. It must be cold to the touch before you scrape or add more wax. Once the skis have cooled, repeat the entire process with your top wax -- this is usually a wax with a high fluorine content. This time, instead of making three passes in succession, wait five minutes between each pass. It takes a while, but it will be worth it when your skis scream past everybody else on the flats. After the second waxing, and a final-final cooling, use a scraper, hold it at an gle, and scrape down the length of the ski. Start at the tips, work your way to the tails. Scrape a couple of times until only slight wisps of wax come off. Now you brush the wax in with a stiff nylon brush. Follow that with some medium steel wool, taking care not to dull the edges. Finally, buff it all nice and smooth with a soft cloth. Your wax job will last a while, you will have better control, and glide easily where others have to pole along. Red wax, blue wax, k-wax, hard wax...confusing, isn't it? Despite the wax manufacturers best attempts to convince you that you need this or that depending on temperature, conditions, etc., it's a proven fact that some people ski better on a given wax, some work better based on climate and moisture content...so who's to know? The best way to go for somebody intent on doing his or her own waxing is to start with the Swix Waxing Kit with five types of wax and a variety of scrapers. This will get you on your way quickly, and the variety of ski wax alone is worth the cost. (The hotlink is to amazon.com, which will save you about $6 off retail and has an excellent return policy if anything goes askew). Emergency WaxSometimes you get to the hill and everything seems out of kilter. Conditions are off, your skis seem to disagree with you, nothing feels right. Often when you're on ice it will just scrape the wax right off the bases. For days like this I carry a small bar of ski wax in my pocket, and rub it on the bases every few runs. Not perfect, but it helps when skis and skier are tired and cranky. The brand I carry in my pocket for this is Hotel Wax; it's a good all-purpose, fluorine content wax that doesn't cost a lot. You'll often see those goofy snowboarders rubbing this stuff on. Fluorine? What's that all about? Well, it makes the wax slippery. Same principle as Teflon®, a brand of plastics made by DuPont. Teflon fluoropolymers have names like FEP, PFA, PTFE, etc., in each case the "F" represents the fluorine segment of the mix. Nothing sticks to Teflon, right? Same thing with skis -- and since the Teflon won't stick to the ski, it's added to wax, which will -- and in turn the fluorine content prevents the ski from sticking to the snow. Glide on! Last Word on Waxing...Perhaps you're reading this and wondering why it doesn't jive with what the guy at your ski shop said, something like "oh, you only need to wax once a year." Consider for a moment that wax enables your ski to glide better, slide better, and it makes lateral movement (necessary for turning) easier. Now consider the fact that every pro ski racer skis each run on freshly waxed skis.
-- Rick Bolger Before you wax, you need to make sure your base structure is right...click here for the why & how of structuring your skis. |
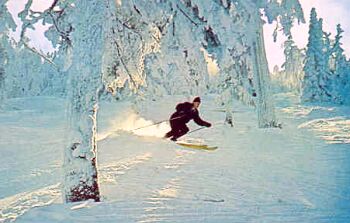

 Ski shop circa 1960
Copyright © 2003-2010 Slackpacker. Teflon is a registered trademark of E.I. DuPont de Nemours and is not part of any product described on this page.
I shan't be gone long -- you come too.
-- Robert Frost